
Tasmota vs ESPurna vs ESPEasy -
connecting and configuring
Now that you got your firmware compiled and loaded to your favorite ESP8266 device, it’s time to connect it to your home network, configure attached sensors and connect it to MQTT. In this post, I’m examining a process of doing initial configuration and connection using 3 favorite alternatives and will share the overall look and feel.
This is not a tutorial on how to configure each firmware - for that, you should look up documentation.
Connecting to WiFi
There’s two different philosophies for connecting your newly flashed firmware to your home network:
- Admin AP - option embraced by ESPurna and ESPeasy by default, but also a theoretical option in Tasmota, in which newly flashed firmware will create uniquely named network that you can connect to, and then perform a Wifi scan to find your own home network. This is similar to how most of stock vendor-provided firmware is behaving.
- Connection to existing Wifi - option adopted by Tasmota by default, but also available in ESPurna and in ESPEasy, in which Wifi SSID and Password are set as part of compile-time options, and firmware will try to connect to predefined SSID.
Admin AP
Most users will initially appreciate Admin AP option as it’s very easy to identify newly flashed device and start working with it.
ESPEasy creates open AP (no password) that implements HTTP redirect during initial connect, which saves you from searching for IP address of device and automatically drops you to configuration screen. In this screen, you can see all Wifi networks available to device, and on you can connect to one of them. ESPEasy will attempt the connection and will let you know if it’s successful, as well as what’s going to be the IP address of your new device.
This is a very stress free experience and works like a charm, with minor security concern of AP being open during few initial minutes of provisioning.
ESPurna doesn’t implement HTTP redirect, so once you connect to SSID ESPURNA_XXXXXX (xxxxxx being unique string, password being fibonacci by default), you will have to open your browser and head to http://192.168.4.1. Nice thing about ESPurna is forced use of password and forced change of default one (default user/pass: admin / fibonacci), which is a nice step towards increased security. Experience with setting Wifi is not as nice as the one with ESPEasy, but it’s still very nice.
Tasmota uses WPSSetup mode which is a fallback option in case none of the configured SSID can be connected to. In theory, if neither configured Wifis can be reached, firmware would fall into WPS Setup mode for 3 minutes. Ther are two issue with that: Mac OS and IOS don’t support WPS natively, and there seems to be a bug in the code that reboots the firmware as soon as it goes into WPS mode.
There’s also a SmartConfig mode, but sadly, it’s not default, and if you already need to change user_config_override.h, you might as well configure your own SSID/pass and get on with it. Having said that, I have to be honest to say I haven’t tested SmartConfig mode and have no clue how it works.
Having said all of this, I was never able to put Tasmota into “Admin AP” mode, but, if you read on, you’ll figure out I’m not a big fan of this method of configuration and would rather prefer predefined Wifi settings.
Predefined Wifi settings
While option of having an Admin AP might sound more user-friendly, I actually found out that mass rollout of new devices is somehow easier if they all instantly connect to my home Wifi, so I prefer the option of configuring that during compilation. This way, some of the security issues are avoided and I can skip 2-3 extra steps for each of the device I have.
Tasmota uses this as a default method, and ESPurna and ESPEasy allows it through the use of compile flags.
For ESPurna, you just have to add two following parameters to your platform.ini build environment:
[env:your-build-name]
[...]
build_flags = ${common.build_flags} -DWIFI1_SSID=\"my-wifi-ssid\" -DWIFI1_PASS=\"my-wifi-password\"
(note \ in front of " to escape shell interpretation of quotes)
Similarly, for ESPEasy, you’d have to change your platformio.ini to include:
[common]
build_flags = -D BUILD_GIT='"${env.TRAVIS_TAG}"' -DDEFAULT_SSID=\"my-wifi-ssid\" -DDEFAULT_KEY=\"my-wifi-password\"
With Tasmota, you can also use similar trick, or, as Theo designed, should add these 4 lines to your user_config_override.h:
#undef STA_SSID1
#define STA_SSID1 "my-wifi-ssid"
#undef STA_PASS1
#define STA_PASS1 "my-wifi-password"
There’s an interesting consequence of choices with Tasmota - github version of Tasmota includes Theo’s own SSID (indebuurt1) with appropriate password and is configured to connect to that network. Anyone recompiling firmware will probably change this in their user_config_override.h, but those getting precompiled binaries are often running into a problem of their devices “being bricked” because devices keep trying to connect to Theo’s home network that doesn’t exist elsewhere. Truth is, there’s a fallback configured to start Wifi in WPS mode after a certain timeout, but it seems timeout is too long for folks to wait, so they head to GitHub issues to report a problem.
If this happens to you, configure your phone to be called indebuurt1 and configure appropriate hotspot password, and your device will connect to it. After that, just change the Wifi settings and you’ll be good.
WebUI look and feel
Once you manage to connect to the same network as your newly flashed device, you can connect to its Web UI to configure rest of the settings. This is how initial login screens look like in different firmware options (I deliberately included desktop version of the WebUI).
As you can see below, all UIs are “mobile friendly”, and will render more or less fine on your phone too. Tasmota and ESPeasy are providing that experience using predefined widget sizes (so desktop versions look pretty narrow and empty, as above), while ESPurna decided to use fully-fledged progressive UI for having proper mobile and desktop versions of UI.
Tasmota
Tasmota will initally show you a main screen with buttons representing sub-functionality:
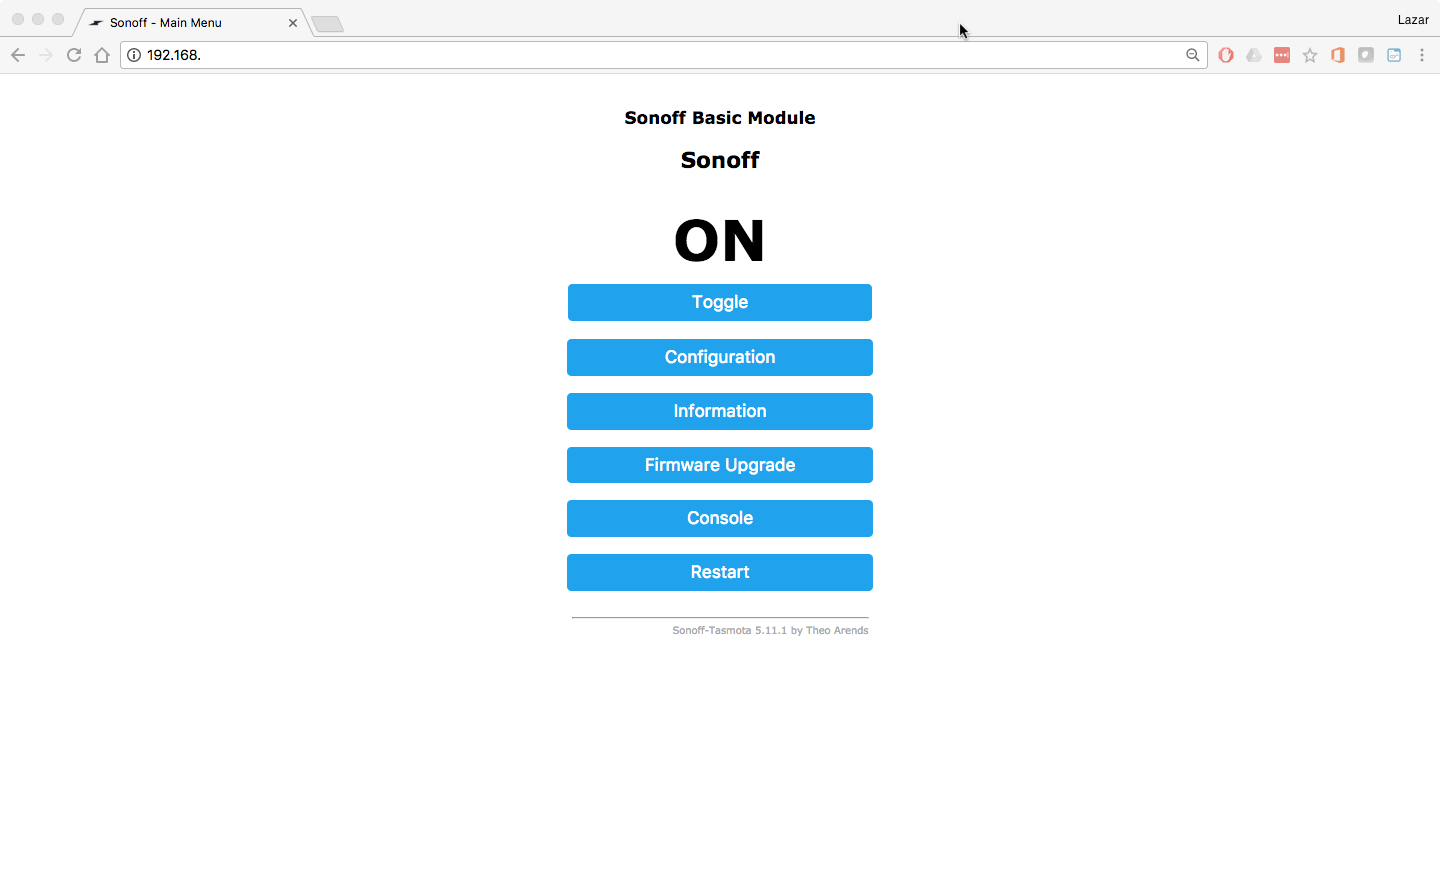
You can notice that Tasmota is not yet configured, and by default, assumes you are using Sonoff Basic module that has one relay, which you can toggle using a Toggle button.
ESPurna
ESPurna will first ask you to change the password, as described above, but after that will send you to a status page with any buttons / sliders that can control your connected devices (remember, you already made a choice of board type and hardware during compile time, so ESPurna already knows what it can control).
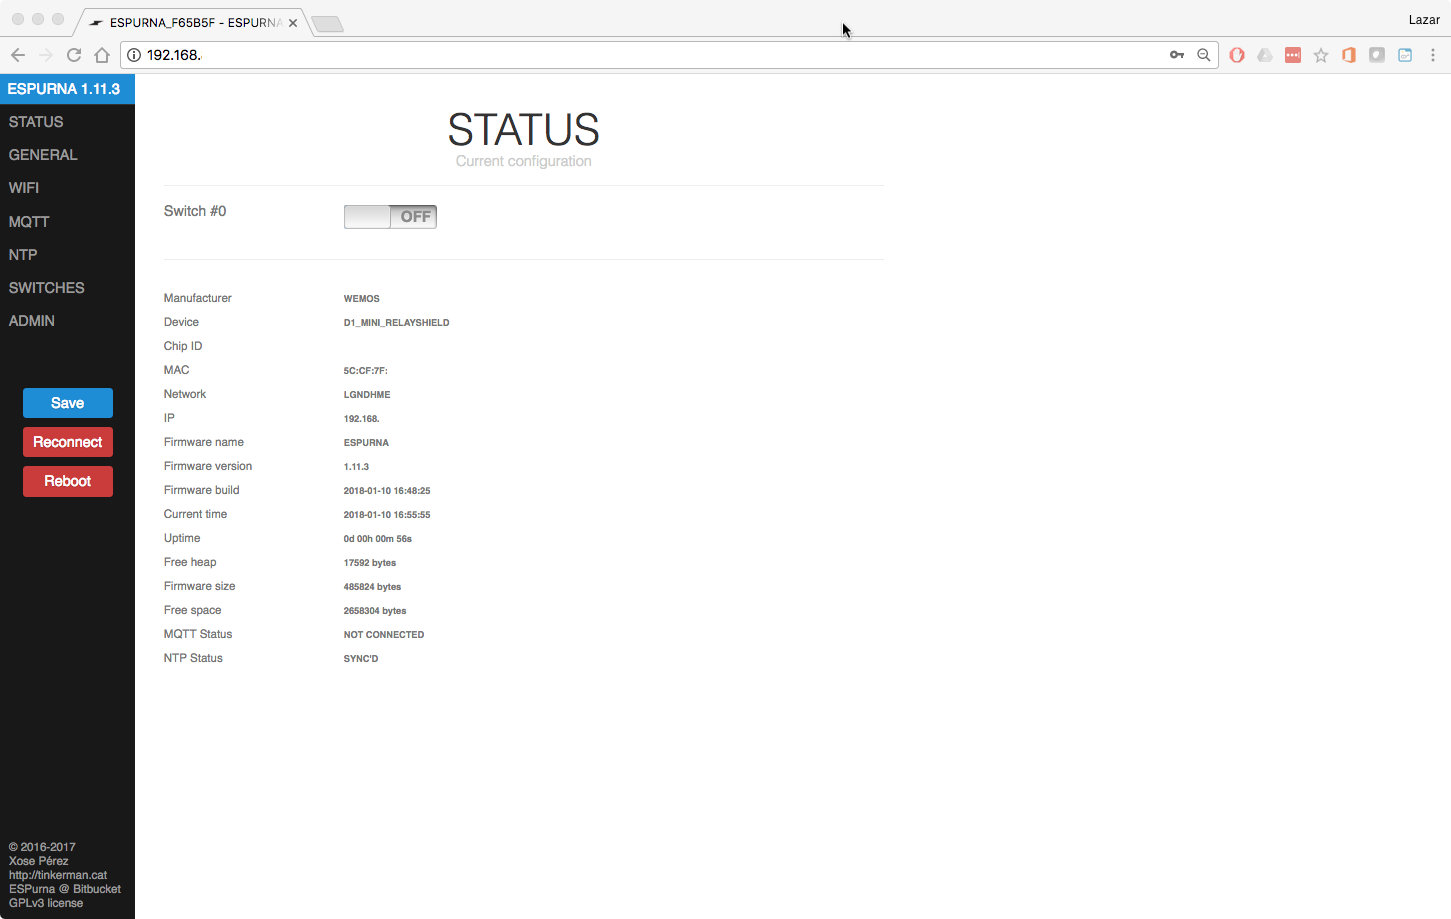
Side menu contains few options and action buttons, and sidemenu itself is sensitive to screen with, so it will be tucked away if you access ESPurna from your mobile device.
ESPEasy
ESPEasy will welcome you with a status screen where you can review your parameters:
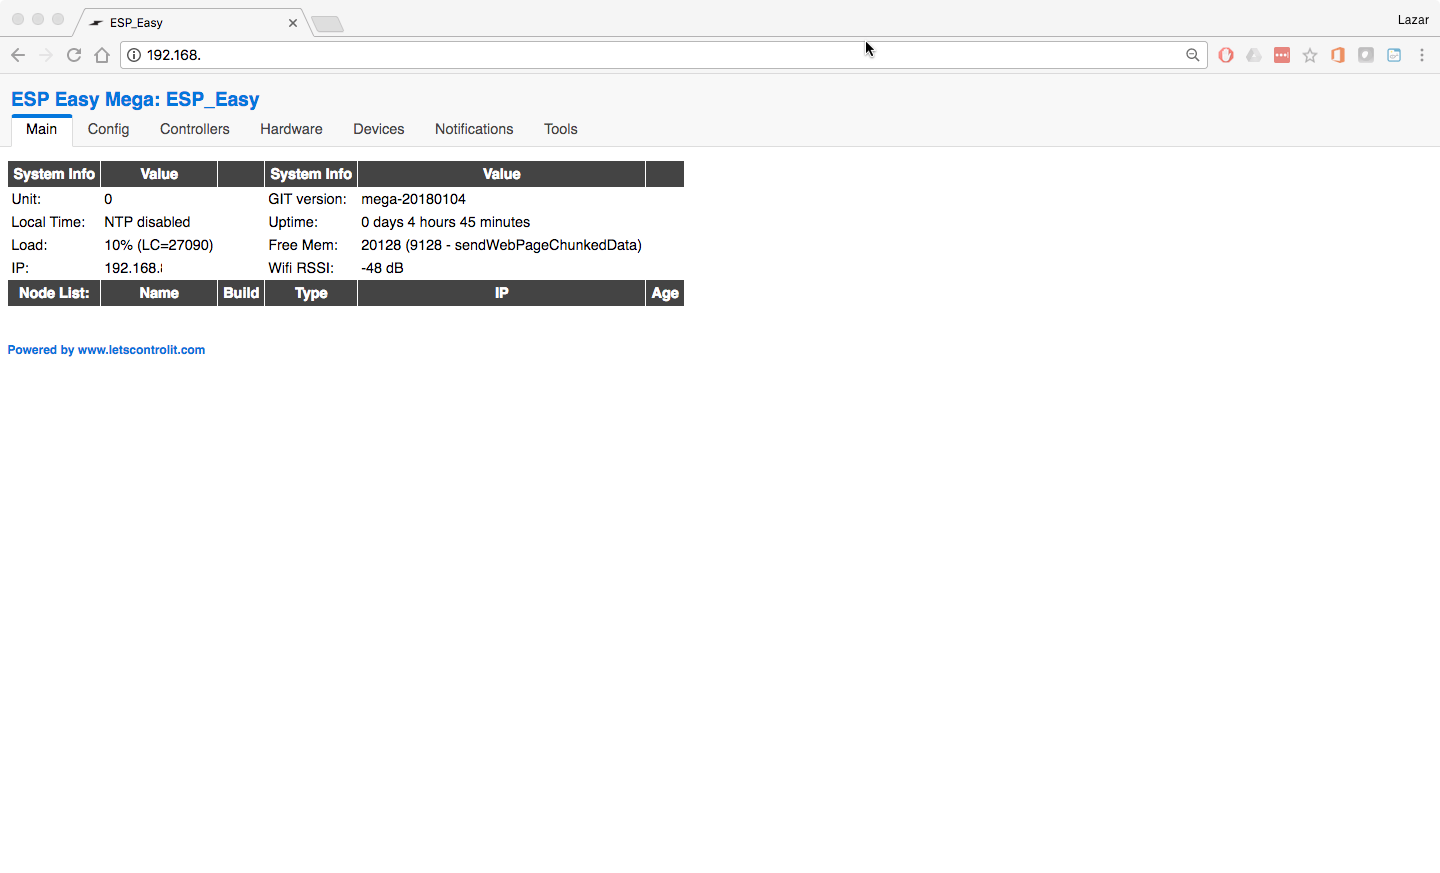
You can notice menu tabs on the upper side of the screen.
Configuration
Tasmota
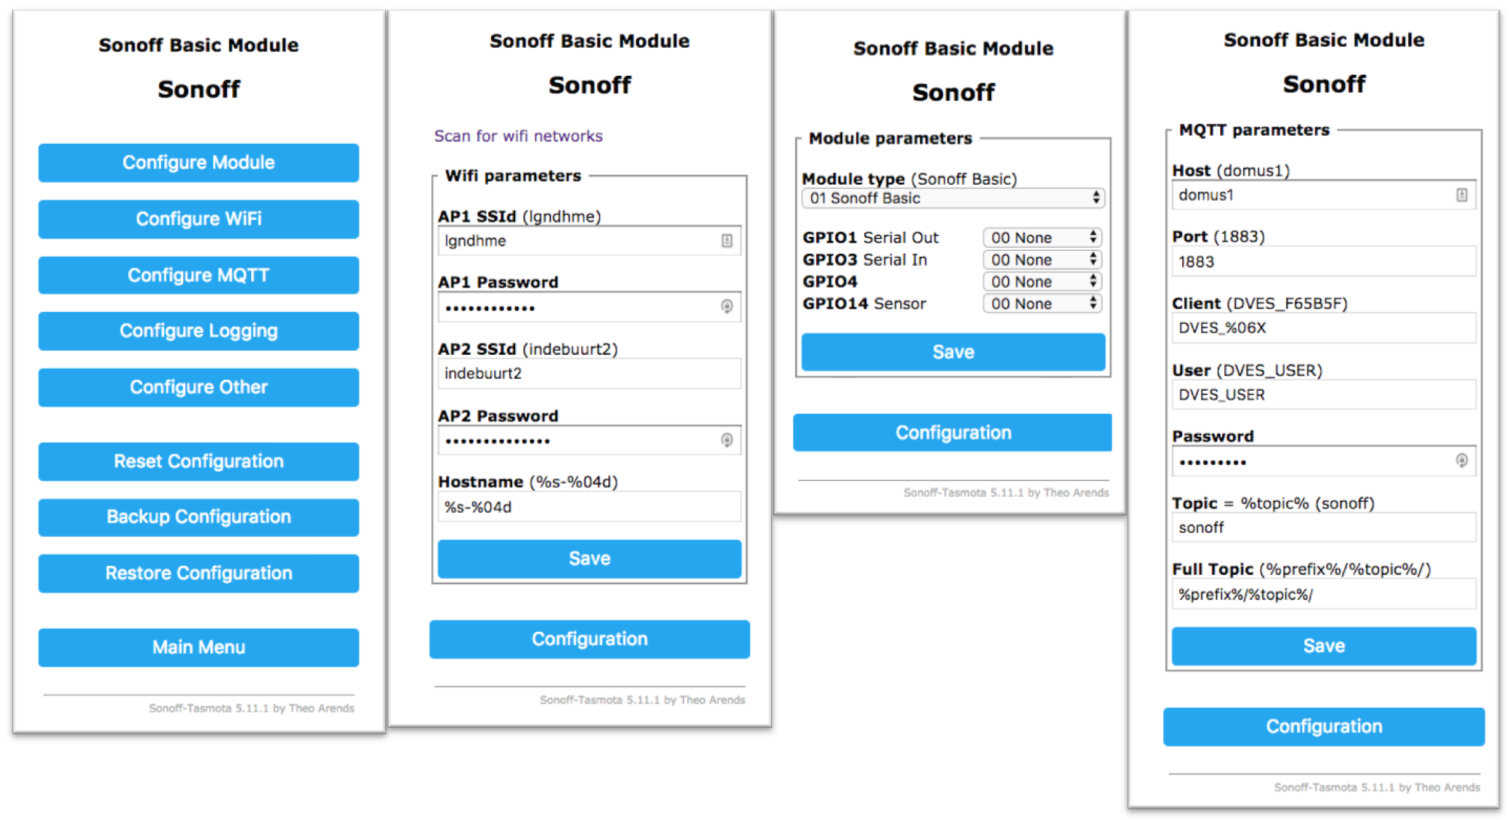
Tasmota has a separate menu for configuring various things. There, you can configure hardware, Wifi, MQTT, logging, emulations and perform backup and restore of your config. Below, I’m showing parts of 4 different screens that are: top configuration, Wifi sub-configuration, Module sub-configuration and MQTT sub-configuration. There’s few more, but you get the idea.
Most of the configuration changes require restart, as they have dependency on behaviour of other parts of firmware, so be prepared for frequent “Please wait, restarting” messages.
Few interesting things here:
- Tasmota allows you to setup 2 Wifi SSIDs. They will be used based on their availability - Tasmota will try connecting for first one, and if not available, to second. Once it connects to a Wifi, it will keep it for as long as it’s available, even if other SSID has better signal strength.
- To help you with Wifi choices, it offers “Scan for Wifi networks” option, which will list all available network at the time of configuration, and will help you pre-populate SSID name, if you click on your favorite Wifi.
- GPIO configuration is Module dependent, so to be able to access a particular GPIO, you need to set the right module type that exposes that GPIO. Module configuration called “Wemos D1 mini” can be used as “Generic module” allowing you to change any GPIO setting, but be careful not to redefine GPIOs used for Flash access.
- You can customize your MQTT full topic format, to better match your automation software layout. By default, Tasmota has following configured. Prefix is one of the
cmndfor commands,statfor status messages andtelefor periodic telemetry messages, and topic is device or group name set above. This becomes a root to which different subtopics are set, for example:- Sending a message
ONtocmnd/<device>/POWERwill turn the relay on. - This would generate
stat/topic/POWER = ONmessage to confirm that relay was indeed turned on. - Periodically, you can see
tele/<topic>/STATEortele/<topic>/SENSORmessages.
- Sending a message
You can verify that everything works correctly by using control buttons on the main page (“Toggle”) which may have more than one button. If you also configured sensors, you’ll see the readouts there. You can, of course, do that over the MQTT, by sending a simple POWER ON command:
$ mosquitto_pub -t cmnd/sonoff/POWER -m ON
(this assumes your topic is ‘sonoff’, that you didn’t customize fulltopic but left it at default, and that you have one relay connected to Sonoff)
ESPurna
ESPurna WebUI is all about configuration, so it has separate pages/tabs for various topics, with a lot of explanation on what parameters actually mean. The only tab that is not configuration related is the “Status” tab that shows basic info about the system and a flip-switch that controls relay compiled in the hardware.
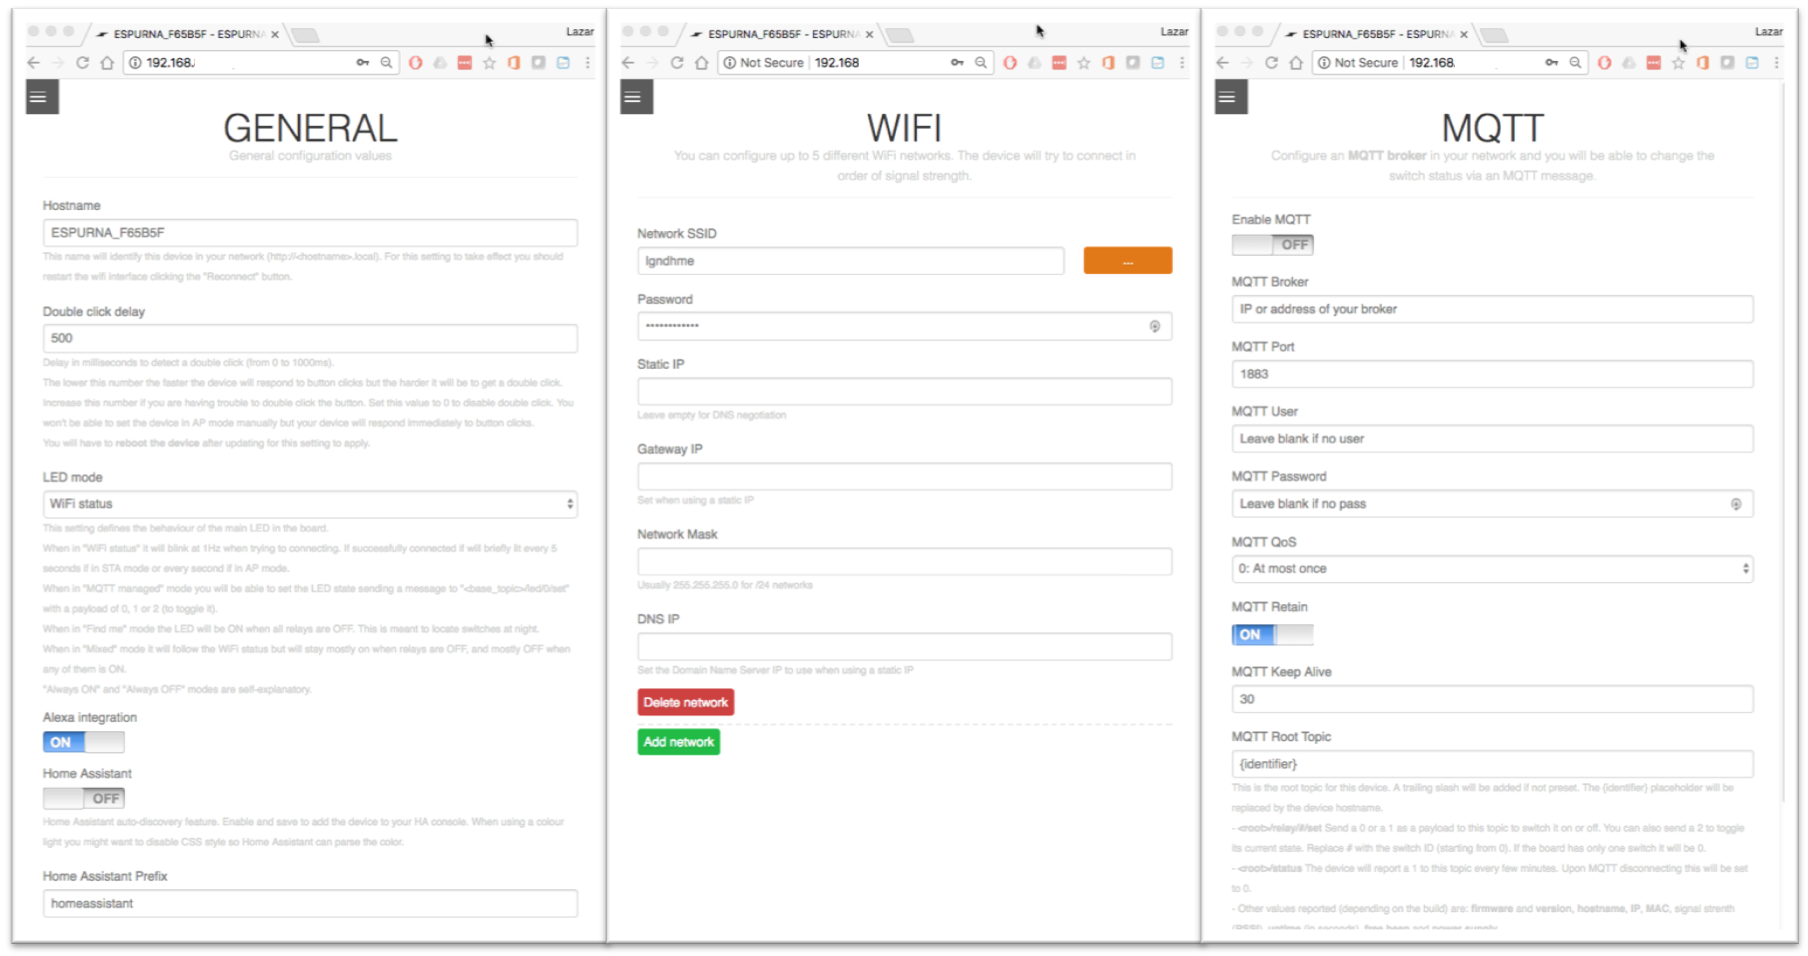
ESPurna doesn’t have a configuration for hardware and modules - as I mentioned earlier, it’s all defined during compile time when modules and sensors are chosen. Picture above shows generic Wemos D1 mini with a relay shield.
Few interesting things on ESPurna:
- You can configure up to 5 different networks that will be used based on their signal strength. System will scan all networks and will choose the one that’s configured with the best signal strenght. This is very nice if your devices are moving or if you have multiple less-stable-APs around your house.
- You can make many changes to the configuration, but they will only be applied once you hit the “Save” button. While it’s logical, I often forget about it and end up trying to understand why some of my settings didn’t made any changes to behavior of firmware.
- Unlike Tasmota, there’s no need to reboot ESPurna for changes to take effect (once you save them ;)
- MQTT messages can be set to use JSON format, which is quite convenient for most of the automation software, including Home-Assistant. Instead of “regular” messages like:
$ mosquitto_sub -t ESPURNA_XXXXXX/\# -v
ESPURNA_XXXXXX/relay/0 0
ESPURNA_XXXXXX/app ESPURNA
ESPURNA_XXXXXX/version 1.11.3
ESPURNA_XXXXXX/host ESPURNA_XXXXXX
ESPURNA_XXXXXX/ip 192.168.XXX.XXX
ESPURNA_XXXXXX/mac 5C:CF:7F:XX:XX:XX
ESPURNA_XXXXXX/rssi -45
ESPURNA_XXXXXX/uptime 3000
ESPURNA_XXXXXX/datetime 2018-01-10 17:44:59
ESPURNA_XXXXXX/freeheap 20840
ESPURNA_XXXXXX/vcc 3036
ESPURNA_XXXXXX/status 1
you can get:
$ mosquitto_sub -t ESPURNA_XXXXXX/\# -v
ESPURNA_XXXXXX/data {"app":"ESPURNA","version":"1.11.3","host":"ESPURNA_XXXXXX","ip":"192.168.XXX.XXX","mac":"5C:CF:7F:XX:XX:XX","rssi":"-46","uptime":"3300","datetime":"Not set","freeheap":"20048","relay/0":"0"}
ESPURNA_XXXXXX/status 1
ESPURNA_XXXXXX/data {"vcc":"3034","host":"ESPURNA_XXXXXX","ip":"192.168.XXX.XXX"}
ESPEasy
Most of ESPEasy WebUI is about configuration - you can find different tabs where you can configure Wifi (Config tab), MQTT or HTTP controllers for the device (COntrollers tab), Hardware, sensors and others.
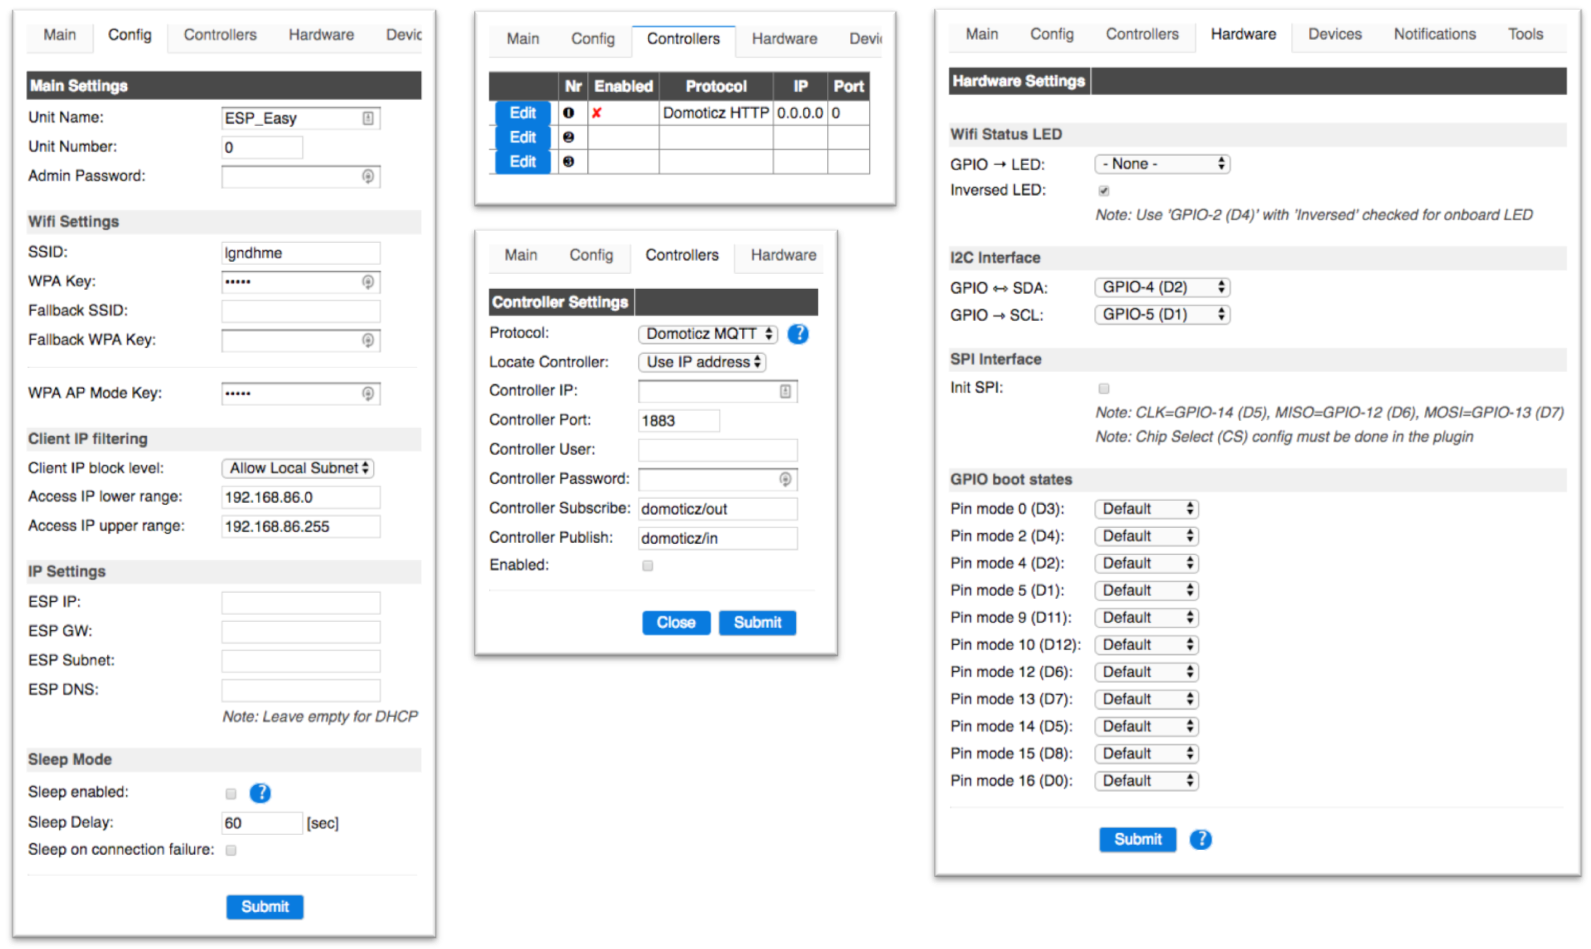
Configuration is a mix of very generic stuff (like hardware definitions - remember that ESPEasy doesn’t have a predefined boards), and very specific stuff (Controller configuration has Domoticz, OpenHAB and PiDome MQTT flavors, but not a generic MQTT broker support), which can sometimes be frustrating.
To configure any MQTT, choose any of the MQTT flavors and apply parameters you need. Domoticz MQTT preset worked fine for me, and after adding IP address of my broker, user and password, it just worked. You can define up to 3 “controller” but unfortunatelly, MQTT can only be selected as controller #1.
As I mentioned, ESPEasy doesn’t come with any hardware predefined. By default it exposes GPIOs over a HTTP interface (Domoticz HTTP controller), so you can turn on and off a relay at specific GPIO using these two URL commands:
http://<ESPEasy IP address>/control?cmd=GPIO,<pin number>,1
http://<ESPEasy IP address>/control?cmd=GPIO,<pin number>,0
I wanted to configure my Wemos D1 mini module with a relay shield (relay connected to GPIO12) and a button (connected to GPIO0) to work like with Tasmota or ESPurna: button would toggle Relay state and publish appropriate message over MQTT, and I could do the same over MQTT itself.
To do that with ESPEasy, I had to
- define “Switch” device and set it exposure to controller (MQTT)
- define link between Switch and a Relay connected to GPIO
Defining a button was relativelly easy - head to Devices, add Task 1, chose type Switch input - Switch and then set a number of parameters:
- name: switch - important for later.
- internal pullup: yes
- GPIO: 0 - where button is connected
- switch button type: Push button, active low
- IDX: 1 - index of messages sent via MQTT
After I submitted this, my button state could be visible via MQTT:
$ mosquitto_sub -t domoticz/\# -v
domoticz/in {"idx":1,"command":"switchlight","switchcmd":"Off"}
domoticz/in {"idx":1,"command":"switchlight","switchcmd":"On"}
domoticz/in {"idx":1,"command":"switchlight","switchcmd":"Off"}
domoticz/in {"idx":1,"command":"switchlight","switchcmd":"On"}
Trouble was, I didn’t wanted ESPEasy to maintain a virtual state of a switch object, I just wanted it to send a note when button was pressed (one press, double-press or long-press, if I can choose). So far, I was not able to configure ESPEasy to do that.
Next, to create a logic that button will flip relay state, I had to enable “Rules” in Tools -> Advanced settings. Then, another item in the menu would appear, allowing me to edit Ruleset 1. Editor like box would appear and I would enter this:
on switch#Switch do
 if [switch#Switch]=1
  gpio,12,1
 else
  gpio,12,0
 endif
endon
This would create internal logic that anytime switch state is changed, it should be synchronized with state of GPIO12.
Powerful? Yes.
User friendly? Not so much.
Summary
Though they are different in implementation, all 3 firmware options give you more-or-less same process for initially connecting to them to a Wifi network.
All of them have WebUI, and I’ll leave aesthetic judgement to you, with a note that WebUI is going to be used only during configuration and troubleshooting time, and that for anything else, you’ll use MQTT.
Hardware configuration is, however, very different: While ESPurna takes one extreme with compile-time hardware definition (but luckily with board presets), ESPEasy takes another with not-so-user-friendly approach of configuring every single bit as if you were programming yourself. I found Tasmota user-friendliness and flexibility just in the right spot for average user.